Outpost 2 Scenario Project Creation Settings
Reviewed For: SDK 2.1 & Visual Studio 2015
Creating new Outpost 2 scenarios requires programming and compiling a new DLL (dynamic link library). This articles reviews specific instructions on preparing Visual Studio to program a scenario DLL. See the Programming a Scenario Wiki Page for a high level overview of creating new scenarios.
This article assumes you are using Visual Studio 2015. However, the instructions should be similar for any installed version of Visual Studio. These instructions would also generally apply for other IDEs such as Code::Blocks, but their implementation steps will differ.
To install Visual Studio 2015, navigate through https://www.visualstudio.com/en-us/visual-studio-homepage-vs.aspx and follow Microsoft's instructions.
If there are difficulties following this article, search through the Outpost Universe Forums or make a new forum post. This tutorial should be able to be completed with little prior programming experience. If you have no previous experience, it is recommended that you work through a beginner C++ book before continuing to program a new scenario. (However, if you are like me, you will probably dive in and then buy the programming book later when nothing makes sense.)
Once you have an IDE project compiling DLLs for Outpost 2, review the Outpost 2 Project Settings Wiki Page for more optional IDE settings that will streamline the scenario development process.
Pull the Outpost 2 SDK from the Outpost Repository
First, you will need a copy of the Outpost 2 SDK. The most up to date version of the Outpost 2 SDK is stored on the Outpost Universe GitHub page. Example scenarios and and a mission template are also on GitHub. For more information on how to access GitHub, see the Outpost Universe Repository page.
Create a New Project through SVN Copy
The benefits of using SVN copy is that a link between the original template and the new scenario is maintained in the repository. The majority (if not all) the project and solution properties will already be preset to the correct values. SVN copy will also be faster then creating a new blank project and setting all the values manually.
How to perform SVN copy:
- Ensure Tortoise SVN is installed
- Ensure a local copy of the Outpost 2 Repository is downloaded onto your computer.
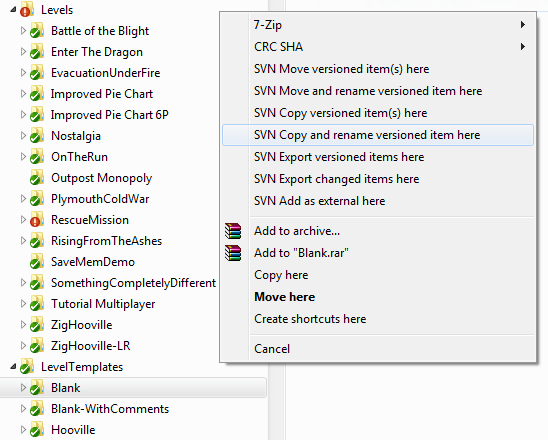
- Hover the mouse over the folder of the scenario template you wish to copy and rename.
- Hold down the right button on your mouse/trackpad.
- While continuing to hold down the right button, drag the folder from the LevelTemplates folder to the Levels folder and release.
- From the drop down menu that appears, select SVN Copy and rename versioned item here.
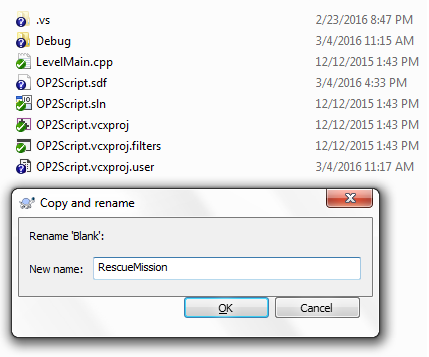
- Enter the folder name of the new scenario. Typically, it is the name of the scenario itself with no spaces.
- Open the new solution in Visual Studio and review.
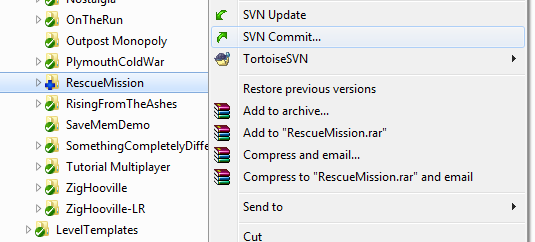
- When satisfied, Commit the new scenario to the online repository by right clicking on the folder and selecting SVN Commit.
Create a New Scenario from Scratch
This sections outlines how to start a scenario from a blank Visual Studio C++ template. However, the recommended way to create a new scenario is through SVN copy and rename as explained above.
Whether a scenario is created through SVN copy or from a blank Visual Studio project, it is best to work within a local copy of the Outpost 2 repository. New scenarios should be placed under Outpost2SVN\LevelsAndMods\trunk\Levels. Create a sub directory under Levels for your new scenario.
Creating a new Project
- From Visual Studio, select File → New → Project → Templates → Other Languages → Visual C++ → Empty Project.
- Uncheck Create directory for solution.
- After naming your new project something cool, click OK.
Note: You may have to install Visual C++ separately if it was not installed with the rest of Visual Studio 2015.
Note: Creating a new project also creates a solution. A solution is a group of related projects. At this point, you will only have the 1 project you created in your solution.
Setting Project Properties
Visual Studio defaults to compiling a project into an executable. Outpost 2 scenarios are compiled as Dynamic Link Libraries (DLL), and this must be set in the project properties.
- Right click on your scenario's project from the Solution Explorer.
- Set Configuration to All Configurations
- Set Platform to All Platforms
- Click Properties → Configuration Properties → General.
- Set Configuration Type to Dynamic Library (.dll).
Including Other Projects in Solution
The Outpost 2 SDK is contained under Outpost2SVN\LevelsAndMods\trunk\API. Typically, projects include both projects Outpost2DLL and OP2Helper. Once familiar with the API, you may want to also use HFL (Hacker's Function Library).
Adding the Outpost2DLL and OP2Helper projects to your solution:
- Right click on your solution from the Solution Explorer.
- Click Add → Existing Project.
- Navigate to the Outpost2DLL folder. Select the file Outpost2DLL (VC++ Project).
- Repeat for other projects.
Note: Your solution name defaults to the same name as the project you first created.
Note: Some projects in the repository may maintain multiple main project files. For example, both a Code::Blocks and Visual Studio project or an older and newer version of a Visual Studio project. Just make sure you select the correct one based on your IDE choice.
Adding References Projects
Once projects are added to a solution, the primary project must be set to reference the new projects. Project references control the order code is compiled in a solution. This will cause the scenario project to recompile in the event that a referenced API project such as Outpost2DLL or OP2Helper is updated with new features or bug fixes.
To Reference another project:
- Ensure the project is included in the scenario (see above).
- In the Solution Explorer, expand your custom mission project.
- Right Click on References → Add Reference.
- Select all projects your scenario will depend on, usually Outpost2DLL and OP2Helper.
Build Platform Toolsets
Microsoft releases new compilers and toolsets over time. Projects created in older versions of Visual Studio may not be compatible with newer versions. Typically, solutions created from Visual Studio 2010 and forward are compatible with Visual Studio 2015, except for the Platform Toolsets.
When you reference other repository projects in your scenario's solution, they may be built for previous versions of Visual Studio. If you do not have the Platform Toolsets for the version of Visual Studio the project is currently set for, your will get the error MSB8020 when attempting to compile your code.
Typical error code received if toolset is not available
Error MSB8020 The build tools for Visual Studio 2010 >(v100) (Platform Toolset = 'Visual Studio 2010 (v100)') cannot be found. To build using the Visual Studio 2010 (v100) build tools, please install Visual Studio 2010 (v100) build tools. Alternatively, you may upgrade to the current Visual Studio tools by selecting the Project menu or right-click the solution, and then selecting "Retarget solution".
MSB8020 can be resolved by either installing the required Visual Studio Toolset or changing the toolset of the older project to the toolset associated with your installed copy of Visual Studio. (This is changed in the project you are referencing, not in your main scenario project.)
To change the Platform Toolset of a project:
- Right click on the project in the Solution Explorer
- Click Properties → General → Platform Toolset
- Click the drop down on the right to pick from a list of installed Platform Toolsets.
If changing the Visual Studio Toolset of a referenced project, you do not have to commit this change to the repository. Others may still be referencing the code using an older version of Visual Studio.
C++ Additional Include Directories
After adding references to the other projects that your scenario will depend on, you usually also need to add an additional include directory to your main project that locates the referenced projects. This helps Visual Studio locate source code from the other projects.
Note: Visual Studio does not show the C/C++ compiler options folder in the project properties until a .cpp file is contained within the project. If your project does not yet contain a .cpp file, ensure you add one before continuing (typically named main.cpp).
Adding Additional Include Directories
- In the Solution Explorer, right click on your project.
- Select Properties → C/C++ → General → Additional Include Directories.
- Select the blank value area to the right of Additional Include Directories.
- Click the down arrow → <Edit..>
- Insert the relative path to the API folder in the SVN. If you follow recommended conventions on placing your project in the repository, the path will be ....\API.
Note: If your project is in the repository, using a relative path for the include directories allows the entire repository to be moved to a different location without breaking the paths. This is very handy for others users who do not put the repository in the same place as you.
Solution Configurations
When a new project is created in Visual Studio, a solution is also created. Within the solution, 2 default configurations are available, Debug and Release. While more custom configurations can be created, these 2 configurations are typically adequate for creating Outpost 2 scenarios.
If you plan on using Visual Studio's debug tools or other debug tools, you will usually want to build using the Debug configuration. The debug configuration will compile the code with full symbolic debug information and no optimization. Compiling the scenario's source code in release configuration will often apply optimizations that remove variables, inline functions, unroll loops or other optimizations that complicate debugging.
If debug tools are unnecessary in a scenario's development, the code may be compiled in release mode for testing. If later testing is required of release mode code and the associated PDB file is available, the release code may still be debugged. In this situation, applied release optimizations may complicate the process.
When ready to build a copy of your DLL for distribution, use the Release configuration. When compiled in the release configuration, more optimizations will be applied to all code within the DLL to run quicker and the compiled DLL should be considerably smaller.
More information can be found at: https://msdn.microsoft.com/en-us/library/wx0123s5.aspx.
Note: Microsoft prohibits distributing compiled code using the DEBUG configuration, so when the mission is finalized, ensure release mode is set before compiling.
Runtime Library Settings
DLLs built in Visual Studio require code from a Microsoft C++ runtime library to operate. Typically, a new version of the runtime library is created when Microsoft ships a new copy of Visual Studio. Required code from the runtime library may either be dynamically linked to (requiring access to the redistributable DLLs), or statically linked to (including the necessary parts of the redistributable .LIB files within the new DLL being compiled). Computers that do not have the required version of the Microsoft C++ Redistributable package installed, cannot consume the DLL.
For Outpost 2 scenarios, the recommended setting for linking to the Microsoft C++ runtime is multi-threaded static linking (/MT).
Using static linking for C++ code generation will allow the DLL to run on computers that do not have the Microsoft C++ 2015 Redistributable installed. However static linking increases the size of the DLL because the DLL must contain code from the redistributable package. If future security or performance updates are made to the redistributable package, the DLL will not benefit from the updates without being recompiled.
Using dynamic linking for C++ code generation will require a Visual C++ Redistributable package be installed on the computer consuming the DLL. The specific required Redistributable will be determined by the Platform Toolset used to build the project. For example, using the Platform Toolset Visual Studio 2015 (v140) will require the computer to have the Visual C++ Redistributable 2015 installed.
Note: Outpost 2 will not provide a useful error message if a scenario requiring a Microsoft C++ Redistributable package is loaded on a machine that does not have the prerequisite. Typical error message received on a Windows 7 machine would be Error: Could not initialize game.
To change the Runtime Library Settings to static linking (recommended for Outpost 2 scenarios):
- From the Solution Explorer, right click on the project and select Properties.
- Ensure Configuration (top left of dialog) is set to Release.
- Click on C/C++ → Code Generation → Runtime Library.
- Select Multi-threaded (/MT).
- If using Debug Mode for code testing, change Configuration to Debug and select Multi-threaded Debug (/MTd).
Further reading on Runtime Libraries: https://msdn.microsoft.com/en-us/library/2kzt1wy3.aspx?f=255&MSPPError=-2147217396
Project Linker Properties
In order for a new scenario to correctly interface with Outpost2.exe, certain linker properties must be set to disable features that did not exist in 1997. These settings disable DLL security features that are not supported by Outpost 2.
Updating Linker Properties
- From Visual Studio, right click on your project in the Solution Explorer.
- Set Configuration to All Configurations.
- Set Platform to All Platforms.
- Select Properties → Linker → Advanced.
Under Advanced Linker Settings:
- Set Randomized Base Address to No (/DYNAMICBASE:NO).
- Set the Base Address to 0x11000000.
- Set Image Has Safe Exception Handlers to No (/SAFESEH:NO).
Randomized Base Address (ASLR) Explained
Address Space Layout Randomization (ASLR), called DYNAMICBASE by Visual Studio, is meant to protect programs by loading the DLL at different random addresses. This is meant to mitigate certain exploits that make use of knowledge of code and data addresses. By rebasing the DLL, it will cause certain exploits with hardcoded addresses to fail (or at best work probabilistically). Unfortunately, by loading the DLL to a new address, any existing pointers into the DLLs address space will be invalidated, and Outpost 2 makes some assumptions that it can save and reload pointers that point into the DLLs address space. In particular, it makes this assumption for the victory condition strings.
For security reasons, Visual Studio 2015 defaults to setting ASLR on, which is incompatible with Outpost 2 code. If creating a new DLL to modify Outpost 2 or creating a new Outpost 2 scenario, ensure the DLL has ASLR off in order to allow setting a consistent base address.
Base Address Explained
The /BASE option in Visual Studio sets a base address where the program or DLL is loaded at, overriding the default location for an .exe file (at 0x400000) or a DLL (at 0x10000000). The operating system first attempts to load a program at its specified or default base address. If sufficient space is not available there, the system relocates the program.
Outpost 2 mission DLLs must be loaded into the same base address in order for saved files to work when Outpost 2 is reloaded. Dynamix produced scenario DLLs use the base address 0x11000000 and all custom made scenarios should use the same base address. If creating a mod or new DLL for Outpost 2, ensure it has a unique base address that does not conflict with mission DLLs or other Outpost 2 DLLs Base Address.
Due to the introduction of Dynamic Base Addresses (also called ASLR) as a security feature, optimizing load addresses by setting specific base addresses has become obsolete. However, Outpost 2 relies on repeatable base addresses since it was programmed before ASLR was a default practice.
Specifying DLL base addresses can optimize their load time. When a preferred load address is taken by another DLL or application, the DLL must be relocated, which requires patching addresses in the image using the relocation table. This takes time, slowing loading of the DLL. If multiple DLLs use the compiler default load address, and they are loaded at the same time by an application, all the DLLs will attempt to use the same default base load address. This situation will force the operating system to choose new locations for each DLL that attempts to use the unavailable load address. The new load address will be unpredictable. In the case of Outpost 2, some functionality requires a repeatable base load address to work correctly.
Safe Exception Handlers Explained
Outpost 2 was compiled before Safe Exception Handlers existed. Visual Studio 2015 defaults to using Safe Exception Handlers. Visual Studio will refuse to compile your project if SAFESEH is on and any part of the compilation does not support SAFESEH. Since it is impractical to add SAFESEH to the original Outpost 2, this property must be left off.
Further Project Settings
Once you have an IDE project compiling DLLs for Outpost 2, review the Outpost 2 Project Settings Wiki Page for more optional IDE settings that will streamline the scenario development process.
Much of the technical information for this article was supplied by Hooman and Arklon.
- Go Back to Outpost 2 Software Development Kit
- Go Back to Outpost 2 Main page
- Go Back to Wiki Home Page


